Thread Identification
International Connections
Guide
Tapered verses Parallel Threads
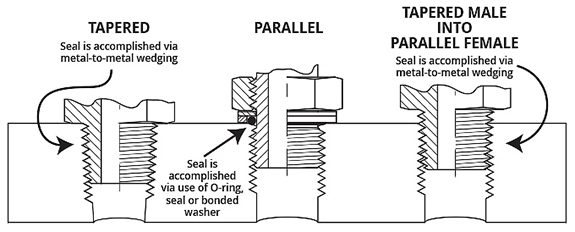
The first step using this thread identification guide is to determine whether the thread is tapered or parallel. Tapered means the thread walls, if continued lengthwise, would eventually meet. Parallel means the thread walls are straight. A seal must be used for parallel fittings in PORT applications.
PORT Seats
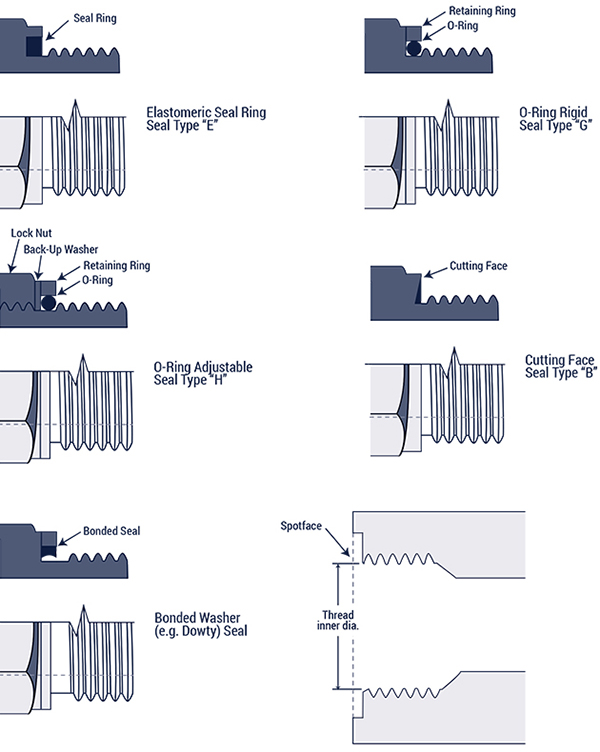
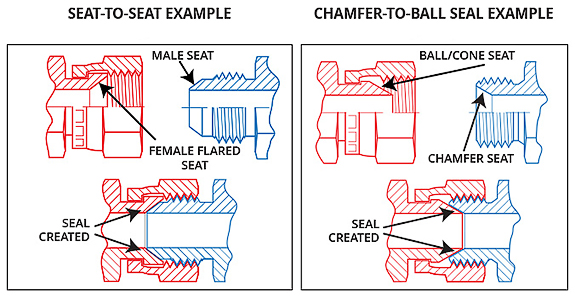
In both Metric and BSPP threads PORT applications require a seal of some style for all parallel thread fittings. Here are some of the different style seals for those PORT applications.
Flared Seat verses Ball Seat
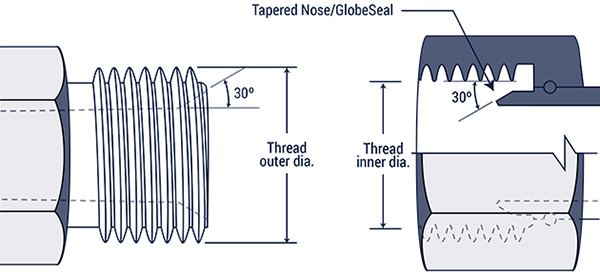
The ability to properly identify seats, chamfers and their corresponding angles is a benefit to the fitting identification. Flared seats refer to the protruding “nose cone” on the male thread or the internal flare on the female thread. Ball or Cone seats refer to the “nose cone” inside the female swivel thread that seals with the chamfer on the inside of a male thread.
24° Metric Compression Fittings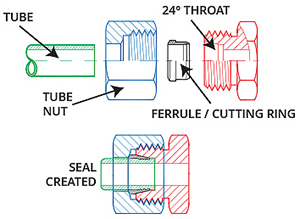
Most metric and Kobelco threads are tube application capable because of a 24° tapered throat
angle that exists inside the male threads. To achieve a tube connection, a tube nut is tightened over the metric threads forcing a ferrule or cutting ring to grip the tube. When the nut is securely fastened, the ferrule squeezes the tube which holds the tube in place.
O-Ring Face Seal Fittings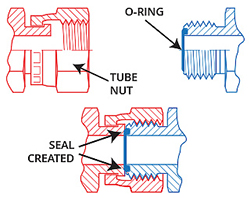
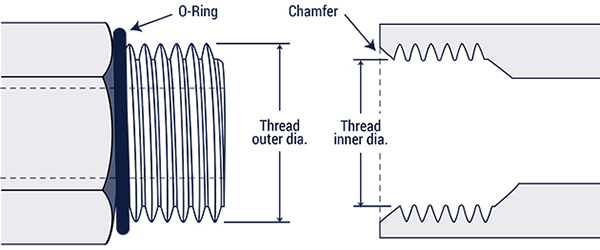
This is a very common fitting in North America known as O-ring Face Seal (ORFS), but is also used with British threads (HIAB) as well as Metric threads (Metric Flat-Face). Essentially, face seal fittings seal between an O-ring located in the face of the straight male thread, and the flat face seat on the female thread.
Measuring Threads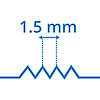
After identifying if the threads are parallel or tapered, measure the thread pitch in millimeters over the top of the thread crests.
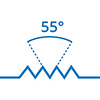
BSP threads come in two versions: parallel (BSPP), and tapered (BSPT). The thread flank angle for both tapered and parallel British threads is 55°. It is a fairly common mistake to identify a BSPT (tapered) as an NPT. Remember that NPT threads have a 60° thread flank angle, and BSPT has a 55° angle. This can be verified with a thread gauge. Although BSP is a foreign thread, it isn’t actually metric. This is why it comes in Imperial sizes: 1/8, 1/4, 1/2, 3/4, and so on.
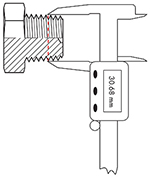
Use a calipers to measure the outside diameter (OD) of the threads. On parallel threads, where you measure isn’t critical. On taper threads it is important to place the calipers on the 3rd row of threads.
Metric thread call out is the OD in millimeters followed by the pitch. Example: M22 x1.5 or 22mm x 1.5.
BSP fittings can be identified by completing a few calculations to find the thread size.
- Measure the OD of the BSP thread
- Take the OD measurement (inches) and subtract ¼ inch
Example: The OD measures 1″. Subtracting ¼ gives the thread size of ¾, also known as -12
Once you have the thread size, it is important to verify the pitch. The easiest way is to follow the following steps.
- Count the number of thread crest over a ¼”
- Multiply that number by 4 to get the number of threads per inch.
Example: If you count 3.5 thread crest over a ¼” and now multiple the 3.5 by 4, your pitch is 14 threads per inch.
- British Standard Pipe Parallel (BSPP)
- British Standard Pipe Tapered (BSPT)
- BSPP PORT (ISO 1179-1 & DIN 3852, Part 2)
- Metric 60° Cone (DIN 7631)
- Metric PORT (ISO 9974-1 & DIN 3852, Part 1)
- Metric PORT (ISO 6149 & ISO 261)
- Metric Tube Compression 24° Cone (DIN 2353)
- Japanese Industrial Standard (JIS 30°)
- HIAB BSPP Flat Face O-Ring
- Komatsu® 30° Flare (JIS Metric)
- Kobelco® Compression 24° Cone
British Standard Pipe Parallel (BSPP)
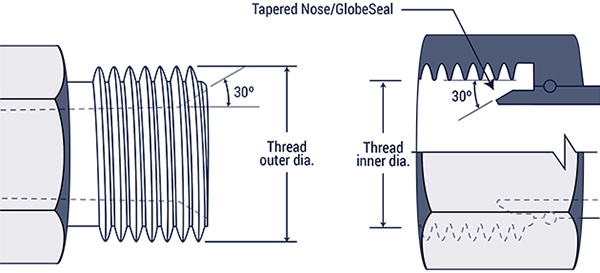
Sealing – The female swivel BSPP has a tapered ball or cone, which seals on the chamfer seat of the male.
| Inch Size | Dash Size | Nominal Thread | Male Thread OD (inch) | Female Thread ID (inch) |
| 1/8 | -02 | G1/8×28 | 3/8 (0.38) | 11/32 (0.35) |
| 1/4 | -04 | G1/4×19 | 33/64 (0.52) | 15/32 (0.47) |
| 3/8 | -06 | G3/8×19 | 21/32 (0.65) | 19/32 (0.60) |
| 1/2 | -08 | G1/2×14 | 13/16 (0.82) | 3/4 (0.75) |
| 5/8 | -10 | G5/8×14 | 7/8 (0.88) | 13/16 (0.80) |
| 3/4 | -12 | G3/4×14 | 1-1/32 (1.04) | 31/32 (0.97) |
| 1 | -16 | G1x11 | 1-5/16 (1.30) | 1-7/32 (1.22) |
| 1-1/4 | -20 | G1-1/4×11 | 1-21/32 (1.65) | 1-9/16 (1.56) |
| 1-1/2 | -24 | G1-1/2×11 | 1-7/8 (1.88) | 1-13/16 (1.79) |
| 2 | -32 | G2x11 | 2-11/32 (2.35) | 2-1/4 (2.26) |
Top of Page
British Standard Pipe Tapered (BSPT)
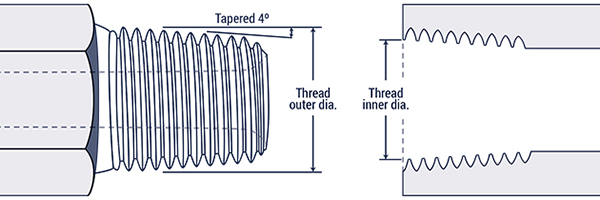
Sealing – Sealing is accomplished by distorting the threads. Thread sealant tape is recommended for a leak free connection. A properly chamfered BSPT male will seal with a BSPP Female Swivel.
| Inch Size | Dash Size | Nominal Thread | Male Thread OD (inch) | Female Thread ID (inch) |
| 1/8 | -02 | R1/8×28 | 3/8 (0.38) | 11/32 (0.35) |
| 1/4 | -04 | R1/4×19 | 33/64 (0.52) | 15/32 (0.47) |
| 3/8 | -06 | R3/8×19 | 21/32 (0.65) | 19/32 (0.60) |
| 1/2 | -08 | R1/2×14 | 13/16 (0.82) | 3/4 (0.75) |
| 5/8 | -10 | R5/8×14 | 7/8 (0.88) | 13/16 (0.80) |
| 3/4 | -12 | R3/4×14 | 1-1/32 (1.04) | 31/32 (0.97) |
| 1 | -16 | R1x11 | 1-5/16 (1.30) | 1-7/32 (1.22) |
| 1-1/4 | -20 | R1-1/4×11 | 1-21/32 (1.65) | 1-9/16 (1.56) |
| 1-1/2 | -24 | R1-1/2×11 | 1-7/8 (1.88) | 1-25/32 (1.79) |
| 2 | -32 | R2x11 | 2-11/32 (2.35) | 2-1/4 (2.26) |
Top of Page
British Standard Pipe Parallel PORT (BSPP PORT)
ISO 1179-1
DIN 3852, Part 2

Sealing – The female port has a machined flat surface (Spotface) which the male seals against.
| Inch Size | Dash Size | Nominal Thread | Male Thread OD (inch) | Female Thread ID (inch) |
| 1/8 | -02 | G1/8×28 | 3/8 (0.38) | 11/32 (0.35) |
| 1/4 | -04 | G1/4×19 | 33/64 (0.52) | 15/32 (0.47) |
| 3/8 | -06 | G3/8×19 | 21/32 (0.65) | 19/32 (0.60) |
| 1/2 | -08 | G1/2×14 | 13/16 (0.82) | 3/4 (0.75) |
| 5/8 | -10 | G5/8×14 | 7/8 (0.88) | 13/16 (0.80) |
| 3/4 | -12 | G3/4×14 | 1-1/32 (1.04) | 31/32 (0.97) |
| 1 | -16 | G1x11 | 1-5/16 (1.30) | 1-7/32 (1.22) |
| 1-1/4 | -20 | G1-1/4×11 | 1-21/32 (1.65) | 1-9/16 (1.56) |
| 1-1/2 | -24 | G1-1/2×11 | 1-7/8 (1.88) | 1-13/16 (1.79) |
| 2 | -32 | G2x11 | 2-11/32 (2.35) | 2-1/4 (2.26) |
Top of Page
Metric 60° Cone
DIN 7631
Sealing – The male connector has metric thread and a 60° (included angle) recessed chamfer. The female has a straight thread and a tapered ball or cone seal seat. The seal takes place between the chamfer of the male and ball or cone of the tapered seal flareless swivel. The threads hold the connection mechanically.
| Dash Size | Metric Thread | Male Thread OD | Female Thread ID |
| -12 | M12x1.5 | 12mm | 10.5mm |
| -14 | M14x1.5 | 14mm | 12.5mm |
| -16 | M16x1.5 | 16mm | 14.5mm |
| -18 | M18x1.5 | 18mm | 16.5mm |
| -22 | M22x1.5 | 22mm | 20.5mm |
| -26 | M26x1.5 | 26mm | 24.5mm |
| -30 | M30x1.5 | 30mm | 28.5mm |
| -38 | M38x1.5 | 38mm | 36.5mm |
| -45 | M45x2.0 | 45mm | 43.5mm |
| -52 | M52x1.5 | 52mm | 50.5mm |
Top of Page
Metric Threads PORT
ISO 9974-1
DIN 3852, Part 1
ISO 261 “M” Metric Threads

Sealing – The fittings have parallel threads and seal using various sealing rings, washers or metal to metal seals.
| Dash Size | Metric Thread | Male Thread OD | Female Thread ID |
| -08 | M8x1.0 | 8mm | 7mm |
| -10 | M10x1.0 | 10mm | 9mm |
| -12 | M12x1.5 | 12mm | 10.5mm |
| -14 | M14x1.5 | 14mm | 12.5mm |
| -16 | M16x1.5 | 16mm | 14.5mm |
| -18 | M18x1.5 | 18mm | 16.5mm |
| -20 | M20x1.5 | 20mm | 18.5mm |
| -22 | M22x1.5 | 22mm | 20.5mm |
| -24 | M24x1.5 | 24mm | 22.5mm |
| -26 | M26x1.5 | 26mm | 24.5mm |
| -27 | M27x2.0 | 27mm | 25mm |
| -33 | M33x2.0 | 33mm | 31mm |
| -36 | M36x2.0 | 36mm | 34mm |
| -42 | M42x2.0 | 42mm | 40mm |
| -45 | M45x2.0 | 45mm | 43mm |
| -48 | M48x2.0 | 48mm | 46mm |
Top of Page
Metric PORT and Stud Ends
ISO 6149
ISO 261 Metric Threads and O-Ring Seal

Sealing – The male connector has a straight metric thread and an O-Ring. The female port has a straight metric thread, a machined surface and a chamfer to accept the O-Ring. The seal is created by compressing the O-Ring into the chamfer. The threads hold the connection mechanically.
| Dash Size | Metric Thread | Male Thread OD | Female Thread ID |
| -08 | M8x1.0 | 8mm | 7mm |
| -10 | M10x1.0 | 10mm | 9mm |
| -12 | M12x1.5 | 12mm | 10.5mm |
| -14 | M14x1.5 | 14mm | 12.5mm |
| -16 | M16x1.5 | 16mm | 14.5mm |
| -18 | M18x1.5 | 18mm | 16.5mm |
| -22 | M22x1.5 | 22mm | 20.5mm |
| -27 | M27x2 | 27mm | 25mm |
| -33 | M33x2.0 | 33mm | 31mm |
| -42 | M42x2.0 | 42mm | 40mm |
| -48 | M48x2.0 | 48mm | 46mm |
| -60 | M60x2.0 | 60mm | 58mm |
Top of Page
Metric Tube Compression (24° Cone)
DIN 2353
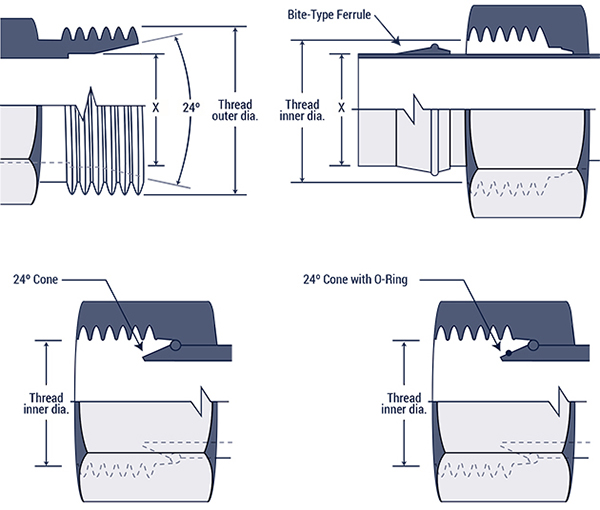
Sealing – Sealing takes place between the 24° chamfer in the male connector and the respective sealing areas on the female ball or cone.
| Dash Size LL Series Tube OD X (mm) | Dash Size L Series Tube OD X (mm) | Dash Size S Series Tube OD X (mm) | Metric Thread | Male Thread OD | Female Thread ID |
| -04LL | M8x1.0 | 8mm | 7mm | ||
| -06LL | M10x1.0 | 10mm | 9mm | ||
| -08LL | M12x1.0 | 12mm | 11mm | ||
| -10LL | M14x1.0 | 14mm | 13mm | ||
| -12LL | M16x1.0 | 16mm | 15mm | ||
| -06L | M12x1.5 | 12mm | 10.5mm | ||
| -08L | -06S | M14x1.5 | 14mm | 12.5mm | |
| -10L | -08S | M16x1.5 | 16mm | 14.5mm | |
| -12L | -10S | M18x1.5 | 18mm | 16.5mm | |
| -12S | M20x1.5 | 20mm | 18.5mm | ||
| -15L | -14S | M22x1.5 | 22mm | 20.5mm | |
| -16S | M24x1.5 | 24mm | 22.5mm | ||
| -18L | M26x1.5 | 26mm | 24.5mm | ||
| -22L | -20S | M30x2.0 | 30mm | 28mm | |
| -28L | -25S | M36x2.0 | 36mm | 34mm | |
| -30S | M42x2.0 | 42mm | 40mm | ||
| -35L | M45x2.0 | 45mm | 43mm | ||
| -42L | -38S | M52x2.0 | 52mm | 50mm |
Top of Page
Japanese Industrial Standard
JIS 30° Flare
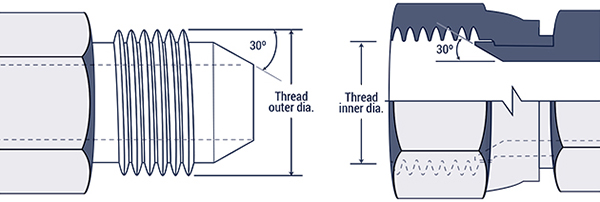
Sealing – The male has a 30° nose and a straight thread. The female half has a 30° flare and a straight thread. This connection is similar to 37° flare. Its 30° seat and BSPP thread dimensions differentiate it from the 37° flare. The seal is created by establishing a line of contact between the male nose and the female flare. The threads hold the connection mechanically.
| Inch Size | Dash Size | Nominal Thread | Male Thread OD (inch) | Female Thread ID (inch) |
| 1/8 | -02 | G1/8×28 | 3/8 (0.38) | 11/32 (0.35) |
| 1/4 | -04 | G1/4×19 | 33/64 (0.52) | 15/32 (0.47) |
| 3/8 | -06 | G3/8×19 | 21/32 (0.65) | 19/32 (0.60) |
| 1/2 | -08 | G1/2×14 | 13/16 (0.82) | 3/4 (0.75) |
| 5/8 | -10 | G5/8×14 | 7/8 (0.88) | 13/16 (0.80) |
| 3/4 | -12 | G3/4×14 | 1-1/32 (1.04) | 31/32 (0.97) |
| 1 | -16 | G1x11 | 1-5/16 (1.30) | 1-7/32 (1.22) |
| 1-1/4 | -20 | G1-1/4×11 | 1-21/32 (1.65) | 1-9/16 (1.56) |
| 1-1/2 | -24 | G1-1/2×11 | 1-7/8 (1.88) | 1-13/16 (1.79) |
| 2 | -32 | G2x11 | 2-11/32 (2.35) | 2-1/4 (2.26) |
Top of Page
HIAB
BSPP Flat Face O-Ring
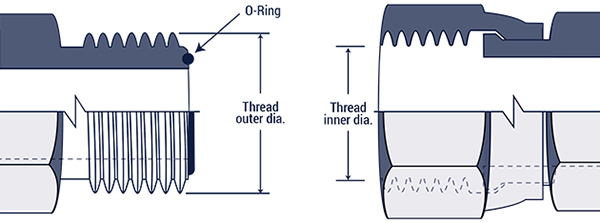
Sealing – The seal takes place by compressing the O-Ring onto the flat face of the female. The threads hold the connection mechanically.
| Inch Size | Dash Size | Nominal Thread | Male Thread OD (inch) | Female Thread ID (inch) |
| 1/8 | -02 | G1/8×28 | 3/8 (0.38) | 11/32 (0.35) |
| 1/4 | -04 | G1/4×19 | 33/64 (0.52) | 15/32 (0.47) |
| 3/8 | -06 | G3/8×19 | 21/32 (0.65) | 19/32 (0.60) |
| 1/2 | -08 | G1/2×14 | 13/16 (0.82) | 3/4 (0.75) |
| 5/8 | -10 | G5/8×14 | 7/8 (0.88) | 13/16 (0.80) |
| 3/4 | -12 | G3/4×14 | 1-1/32 (1.04) | 31/32 (0.97) |
| 1 | -16 | G1x11 | 1-5/16 (1.30) | 1-7/32 (1.22) |
| 1-1/4 | -20 | G1-1/4×11 | 1-21/32 (1.65) | 1-9/16 (1.56) |
| 1-1/2 | -24 | G1-1/2×11 | 1-7/8 (1.88) | 1-13/16 (1.79) |
| 2 | -32 | G2x11 | 2-11/32 (2.35) | 2-1/4 (2.26) |
Top of Page
Komatsu® 30º Flare
JIS Metric
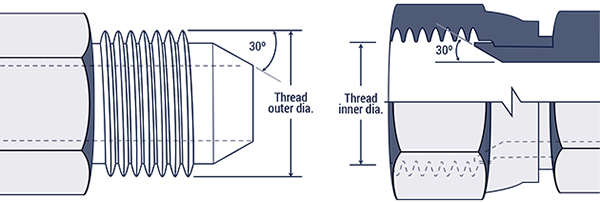
Sealing – The male has a 30° nose and a straight thread. The female half has a 30° flare and a straight thread. This connection is similar to 37° flare. Its 30° seat and Metric thread dimensions differentiate it from the 37° flare. The seal is created by establishing a line of contact between the male nose and the female flare. The threads hold the connection mechanically.
| Dash Size | Nominal Thread | Male Thread OD | Female Thread ID |
| -14 | M14x1.5 | 14mm | 12.5mm |
| -16 | M16x1.5 | 16mm | 14.5mm |
| -18 | M18x1.5 | 18mm | 16.5mm |
| -22 | M22x1.5 | 22mm | 20.5mm |
| -24 | M24x1.5 | 24mm | 22.5mm |
| -30 | M30x1.5 | 30mm | 28.5mm |
| -33 | M33x1.5 | 33mm | 31.5mm |
| -36 | M36x1.5 | 36mm | 34.5mm |
| -42 | M42x1.5 | 42mm | 40.5mm |
Top of Page
Kobelco® Compression 24° Cone

Sealing – Sealing takes place between the 24° chamfer seat in the male connector and the respective sealing areas on the female ball or cone.
| Dash Size | Nominal Thread | Male Thread OD | Female Thread ID |
| -30 | M30x1.5 | 30mm | 28.5mm |
| -36 | M36x1.5 | 36mm | 34.5mm |
| -45 | M45x1.5 | 45mm | 43.5mm |


