Dangers while Working with Hydraulic Fluids

Health Problems While Using Hydraulic Fluids

People can become exposed to the chemicals in hydraulic fluids. The exposure to chemicals may be due to inhalation, ingestion, or touch. There are instances of people suffering from skin irritation or weakness in hands while handling hydraulic fluids. There are also cases of intestinal bleeding, pneumonia, or death through hydraulic fluid ingestion though no serious hazards are reported with hydraulic fluid inhalation. These are only some of the dangers of hydraulic fluid.

Similar to ingestion, fluids can be accidentally injected into the skin as well. This takes place when the high-pressure hydraulic system hose is disconnected and toxic fluids are leaked and injected into the skin. If there is a small leak in the hydraulic pipe and someone runs there hand along it, at 2000 psi, they can easily incur an injection of hydraulic fluid and may not even be aware that it happened until gangrene begins to set in.

 Fire Dangers Associated with Hydraulic fluids

When working with hydraulic fluid, there is every chance that the hydraulic fluid gets heated to high temperatures. And it is evident that most petroleum-based hydraulic fluids will burn and thereby create explosions and burns.

Environmental Problems Related to Hydraulic Fluids

Another hazard of hydraulic fluid is that when the hydraulic hose or pipe leaks, the chemicals of the fluids can either stay on top of the soil or sink into the ground. If the chemicals get mixed in a water body, they will sink to the bottom. In fact in such cases the chemicals can stay there for more than a year. Aquatic life can absorb the toxic hydraulic fluid, leading to illness or death to the animal or anything higher on the food chain. For example, a hawk that eats a fish that has been contaminated by hydraulic fluid that was mixed in water could become ill as well.

Fluid Texture Problems

Although the slimy texture of hydraulic fluids may not seem like a danger or a problem, a spill can cause a person to slip and fall. Also when there is fluid on the hands of a person, it can cause him to slip while climbing on a machine. It can also cause the operator to lose steering control.

Safety Precautions

There are numerous dangers of hydraulic fluid involved, like skin irritation, fires, explosions, environmental damage, and a slippery workplace. But hydraulic fluids are required for many machines to function. Therefore it is necessary to follow certain precautions while using these fluids. With proper knowledge of these hazards, working with hydraulic fluid can be safe.

  • In order to avoid skin irritations, it is necessary to wash contaminated skin immediately. It is also necessary to keep your clothing clean.
  • Wearing masks and gloves while using hydraulic fluids is also helpful.
  • To avoid environmental dangers, there is a biodegradable hydraulic fluid option, though it is more expensive.
  • To avoid fires, materials and fluids soaked in hydraulic fluid should be stored in sealed metal containers and disposed of at proper places.
  • To check for leaks, use cardboard.


Craig Cook


The 6 Most Common Mistakes with Hydraulic Equipment

Mistake No. 1 Changing the Oil

There are only two conditions that mandate a hydraulic oil change: degradation of the base oil or depletion of the additive package. Because there are so many variables that determine the rate at which oil degrades and additives get used up, changing hydraulic oil based on hours in service, without any reference to the actual condition of the oil, is like shooting in the dark.

Given the current high price of oil, dumping oil which doesn’t need to be changed is the last thing you want to do. On the other hand, if you continue to operate with the base oil degraded or additives depleted, you compromise the service life of every other component in the hydraulic system. The only way to know when the oil needs to be changed is through oil analysis.

Mistake No. 2 Changing the Filters

A similar situation applies to hydraulic filters. If you change them based on schedule, you’re changing them either too early or too late. If you change them early, before all their dirt-holding capacity is used up, you’re wasting money on unnecessary filter changes. If you change them late, after the filter has gone on bypass, the increase in particles in the oil quietly reduces the service life of every component in the hydraulic system costing a lot more in the long run.

The solution is to change your filters when all their dirt-holding capacity is used up, but before the bypass valve opens. This requires a mechanism to monitor the restriction to flow (pressure drop) across the filter element and alert you when this point is reached. A clogging indicator is the crudest form of this device. A better solution is continuous monitoring of pressure drop across the filter.

Mistake No. 3 Running too Hot

Few equipment owners or operators continue to operate an engine that is overheating. Unfortunately, the same cannot be said when the hydraulic system gets too hot. But like an engine, the fastest way to destroy hydraulic components, seals, hoses, and the oil itself is a high-temperature operation.

How hot is too hot for a hydraulic system? It depends mainly on the viscosity and viscosity index (rate of change in viscosity with temperature) of the oil, and the type of hydraulic components in the system.

As the oil’s temperature increases, its viscosity decreases. Therefore, a hydraulic system is operating too hot when it reaches the temperature at which oil viscosity falls below that required for adequate lubrication.

A vane pump requires a higher minimum viscosity than a piston pump, for example. This is why the type of components used in the system also influences its safe maximum operating temperature.

Apart from the issue of adequate lubrication, the importance of which cannot be overstated, operating temperatures above 82 degrees Celsius damage most seal and hose compounds and accelerate degradation of the oil. But for the reasons already explained, a hydraulic system can be running too hot well below this temperature.

Mistake No. 4 Using the Wrong Oil

The oil is the most important component of any hydraulic system. Not only is hydraulic oil a lubricant, it is also the means by which power is transferred throughout the hydraulic system. It’s this dual role which makes viscosity the most important property of the oil, because it affects both machine performance and service life.

Oil viscosity largely determines the maximum and minimum oil temperatures within which the hydraulic system can safely operate. If you use oil with a viscosity that’s too high for the climate in which the machine must operate, the oil won’t flow properly or lubricate adequately during cold start. If you use oil with a viscosity too low for the prevailing climate, it won’t maintain the required minimum viscosity, and therefore adequate lubrication, on the hottest days of the year.

But that’s not the end of it. Within the allowable extremes of viscosity required for adequate lubrication, there is a narrower viscosity band where power losses are minimized. If operating oil viscosity is higher than ideal, more power is lost to fluid friction. If operating viscosity is lower than ideal, more power is lost to friction and internal leakage.

Using the wrong viscosity oil not only results in lubrication damage and premature failure of major components, it also increases power consumption (diesel or electricity) two things you don’t want.

And despite what you might think, you won’t necessarily get the correct viscosity oil by blindly following the blanket recommendations of the machine manufacturer.

Mistake No. 5 Wrong Filter Locations

Any filter is a good filter, right? Wrong! There are two hydraulic filter locations that do more harm than good and can rapidly destroy the very components they were installed to protect. These filter locations which should be avoided are the pump inlet and drain lines from the housings of piston pumps and motors.

This contradicts conventional wisdom: that it is necessary to have a strainer on the pump inlet to protect it from “trash”. First, the pump draws its oil from a dedicated reservoir, not a garbage can. Second, if you believe it’s normal or acceptable for trash to get into the hydraulic tank, then you’re probably wasting your time reading this article.

If getting maximum pump life is your primary concern (and it should be), then it’s far more important for the oil to freely and completely fill the pumping chambers during every intake than it is to protect the pump from nuts, bolts and 9/16-inch combination spanners. These pose no danger in a properly designed reservoir where the pump inlet penetration is a least 2 inches off the bottom.

Research has shown that a restricted intake can reduce the service life of a gear pump by 56 percent. And, it’s worse for vane and piston pumps because these designs are less able to withstand the vacuum-induced forces caused by a restricted intake. Hydraulic pumps are not designed to “suck”.

A different set of problems arises from filters installed on the drain lines of piston pumps and motors, but the result is the same as suction strainers. They can reduce service life and cause catastrophic failures in these high-priced components.

Mistake No. 6 Believing Hydraulic Components are Self-Priming and Self-Lubricating

You wouldn’t start an engine without oil in the crankcase not knowingly, anyway. And yet, I’ve seen the same thing happen to a lot of high-priced hydraulic components.

The fact is, if the right steps aren’t followed during initial start-up, hydraulic components can be seriously damaged. In some cases, they may work OK for a while, but the harm incurred at start-up then dooms them to premature failure.

There are two parts to getting this dilemma right: knowing what to do and remembering to do it. Not knowing what to do is one thing. However if you do know, but forget to do it, that’s soul-destroying. You can’t pat yourself on the back for filling the pump housing with clean oil when you forgot to open the intake isolation valve before starting the engine!


Craig Cook

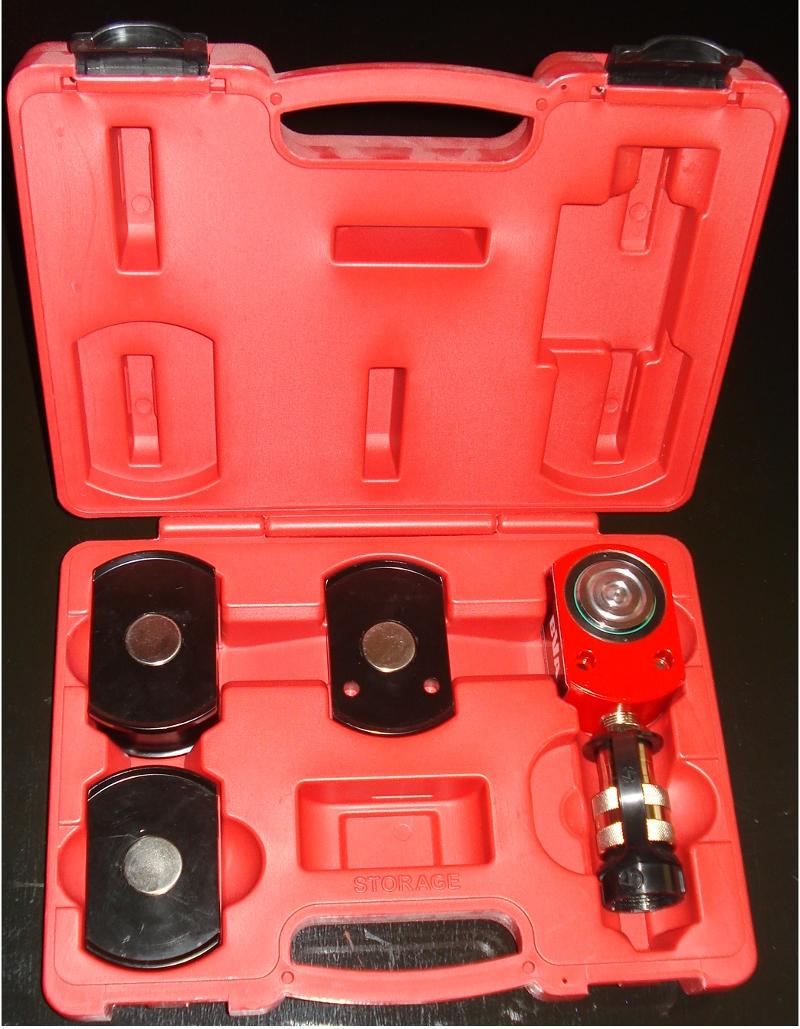
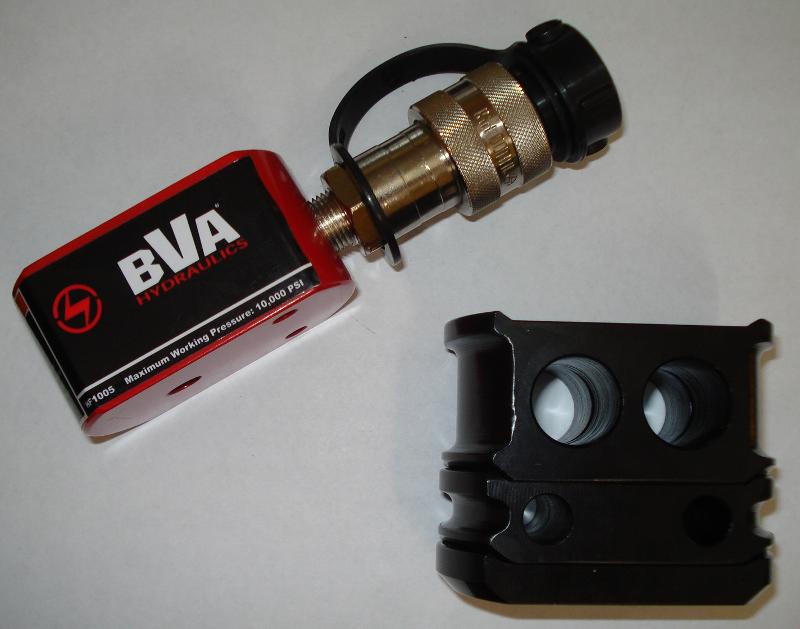
Fit in to Tight Spaces with our Pan Cake Cylinder Kit!

This is a 4-in-1 pan cake cylinder kit

red case H&F  pan cake cylinder kit

You have the ability to fit into a space as tight as 1.69″ to as high as 4.44″ with a cylinder stroke of .43″ (with a max working pressure of 10,000 psi/700 bars) giving you that extra lift you need to get the job done.

It comes in a sleek red case to make it easy for you to take it on the go.

This BVA cylinder kit costs less than the equivalent model you can get from Enerpac!

Craig Cook

How to Replace Hydraulic Hoses

Heavy equipment uses a hydraulic pump, valve spools, and cylinders to perform their tasks. These components are interconnected with a series of steel tubes and steel reinforced rubber hoses, and the hydraulic oil may eventually begin to leak through these hoses, making it necessary to replace them. It can be a dirty job, but doing it yourself can save considerable costs and time.

  • Locate the problem hose. This may be obvious if the hose has burst, since they typically handle oil at over 2000 PSI pressure, and one that bursts will discharge a large amount of oil in a short time. If the situation is a small leak, though, you will need to observe where the oil is dripping, and follow the wet trail it leaves to the source. Never use your hands or body parts to find the leak. Use cardboard, paper or hydraulic leak detection fluid so no oil injection is accrued. A good hydraulic shop stocks leak detection additives that assist on location the leak safely.


  • Assess how many components must be removed to facilitate replacing the damaged hose. Always label the component removed by number and letter so replacement of parts can be re-installed with ease. This may include housings, guards, clamps, other hoses, hydraulic cylinders, and more. Follow the hose from one end to the other, noting the route you will use to uninstall and re-install it. Putting a number and letter on the ports and hose ends.


  • Determine if the hydraulic component the hose serves, or any other hydraulic components which must be removed have a live load, or weight on them. If the oil in the system you are disconnecting is under pressure, it may blow out forcefully when the fittings which hold it are loosened, causing oil to be discharged under pressure. Relieve the pressure from these cylinders or components before proceeding.


  • Make sure any attachments that are supported by the hydraulic cylinder that the hose operates are lowered to the ground or blocked or chained up. The weight of an attachment can crush a mechanic if it suddenly falls when pressure is relieved in the cylinder that is supporting it.


  • Get the tools you will need to perform the job of removing the hose. The fittings on the each end of the hose will be removed with a wrench, which may vary in size from 9/16 to over 1 1/2 inches. Many of these fittings are designed to swivel or turn as they operate, so two wrenches will be required to remove each of them. Hold the stationary side of the coupling with one wrench to prevent it from turning, and possibly damaging an O-ring while turning the other to separate the coupling.


  • Remove all clamps and attachments which will interfere with removing the hose. Often, the hydraulic cylinder itself will need to be removed or supported so that fittings can be accessed. Hydraulic cylinders are either bolted directly to the boss or fixture which it operates, or is anchored with a steel pin, such as the one in the illustration.


  • Loosen the fitting that attaches the hydraulic hose to the hydraulic system, either at a coupling, a cylinder, or the valve spool itself. Make sure the fitting turns at the threaded connection, and does not twist any other part. If needed, you may have to hold the fitting the hose is attached to with a separate wrench.


  • Pull the hose off of the equipment when both ends are unfastened. Be aware that some hydraulic oil may leak from either or both connections, and the oil that is remaining in the hose will also dump out, so having a bucket handy to catch this spillage is a good idea.


  • Plug the fittings that remain on the machine to keep debris from getting into the system during the interval the fitting is open. If you do not have oil dripping from the fitting, and do not have a plug with the correct threads on it, you may tie a clean rag around the fitting to protect it, but be careful if rain is in the forecast, since a rag won’t protect the system from being contaminated with water.


  • Wipe excess oil from the hose, and give us a call to get a new one weather we have it on the shelf or we have to make it for you. We supply replacement hoses and fittings which can be assembled while you wait, and are less expensive than ordering an original equipment manufacturer’s product.


  • Clean all the fittings on the equipment before re-installing the hose. Make sure there is no dirt in the tubing or fitting which will end up in the hydraulic system when you are finished.


  • Plug the ends of your new hoses with a special cap or a clean rag before routing it through the equipment to where it goes. This will keep dirt and debris from being forced into the hose while installing it. Remove these temporary plugs immediately before installing the fittings where they mate up with their counterparts.


  • Make sure the hose is in the correct location, and it has the proper amount of slack where needed when it is installed, then thread the fittings back on the cylinder or other component where they were removed. Tighten these connections snugly. You may have access to a specification book which recommends a torque to apply to each fitting, but failing this, tighten them as much as you can without risking damaging the seals or stripping the threads which hold them.


  • Replace any clamps, guards, or other components which were removed to accomplish the task. Align any cylinder pins which were removed, and re-install them, and return any split or snap rings which hold them in place.


  • Check the fluid level in the machine, crank it up, and check for leaks. If you have had a chance to clean all surfaces that were soiled by the initial leak, any leaks that occur now will be much easier to spot. Keep in mind some hydraulic circuits will require bleeding to remove air from the system prior to using the machine. This usually applied to steering and brake systems, but there are other situations where air can become trapped, such as a single action cylinder where the hydraulic supply is at a low point in the cylinder.


Craig Cook


Overview of Orientations & Types of Hydraulic Seals

Overview of orientations and types of hydraulic seals. 

Hydraulic seals are available in a wide variety of orientations and different types. The basic types of hydraulic seals that are used in industrial products are rod seals, flange packing, and U-cups.

When purchasing hydraulic seals, it is necessary to consider the following:

  • Diameter of the outer shaft
  • Diameter of the inner seal
  • Diameter of the housing bore
  • Thickness and radial cross section
  • Operating speed and pressure
  • Temperature
  • Vacuum rating

Orientations of Hydraulic Seals

For the various industrial products, the sealing directions are different, which we are discussing below:

  • Rod seal: A rod seal is a type of radial seal. It is fitted into the housing bore. The sealing lip is found in contact with the shaft.
  • Piston seal: This is also a type of radial seal and is a variation of the rod seal. Here the sealing lip is in contact with the housing bore and not with the shaft. It is in the shaft where the seal is pressed.
  • Symmetric and axial seals: A symmetric seal works symmetrical or equal to the piston and rod seals. The axial seal goes in contact or in axis with the housing component.

Hydraulic Seals Types

Basically they are of two types.

  • Dynamic Seals: A dynamic seal is used to separate a fluid from possible contaminants and usually puts a gap between moving and non-moving surfaces. Finds its applications in piston ring. When selecting dynamic seals, it is necessary to focus into a variety of dimensions like inside diameters, outside diameters, radial cross section, axial cross section, and housing bore.
  • Exclusion Seals: They are used to separate contaminants and debris from machine bearings and moving shafts. These hydraulic seals are further sub divided into scrapers, V-ring, and wipers. V-rings are rubber made while wipers have lip seals that are flexible. Scrapers use scraping edges in removing contaminants from the bearings. 


Craig Cook

Hydraulic Filter Locations

The main objective of hydraulic filters is to extend machine life by removing contaminants from the oil.

Hydraulic filter location plays a significant role in the effective performance of a system. The wrong choice location can reduce the service life of the system. There are many locations to be considered. Let us now check out the various hydraulic filter locations:

Pressure Filter or Pressure Filtration

A pressure filter is used sometimes at the pump outlet to prevent entry of contaminants generated in the pump, into other components like valves, etc. and thus help in avoiding the spread of such undesirable elements into the whole system. This will thus protect valves, cylinders etc.

The main advantage of location filter in the pressure line is that it provides maximum protection for components located immediately downstream. Here, there is a possibility of filtration rates of 2 microns or less. But the efficiency of the filter can be reduced by the presence of high flow velocities and pressure.

The major disadvantage of pressure filtration is that it is expensive compare to other filtration location, it has the highest initial and ongoing cost, because the housings and elements must be designed to bear peak system pressure.

Return Line or Return Filtration

Here the fluid cleanliness can be maintained only when the reservoir and the fluid it contains start out clean, and all air entering the reservoir and returning fluid is properly filtered. There is another advantage of this filter location: sufficient pressure is available to force fluid through fine media. There is no complications in filter or housing design because pressure is not high enough. This, combined with relatively low flow velocity, provides a high degree of filtering efficiency at a cost-effective rate.

Return filtration is the most acceptable feature of hydraulic systems. The main disadvantage is that the back pressure formed by the element can adversely affect the operation of or damage some components.

Off-line Filtration

Off-line filtration leads to continuous, multi-pass filtration at a flow velocity and pressure drop which is controlled in a proper way , leading to high filtering efficiency. Filtration rates of 2 microns or less are possible. The main advantage is that polymeric filters and heat exchangers can be used in the circuit for total fluid conditioning. The main disadvantage is its high initial cost.

Suction Filtration

Also known as intake filter, it is fitted before the pump so that it can prevent random entry of large and other contaminants like large chips into the pump and thus preventing damage to it.

This is an ideal location for filtering media. Filter efficiency is increased by the absence of both high fluid velocity and high pressure drop. High fluid velocity can disturb trapped particles and drop in high pressure can force migration of particles through the media.


Craig Cook

How to Reduce Noise Emission

I got a HUGE response from sending out the cheat sheets, many people printing them off for quick reference for when they need them.

I’m glad they were helpful!

How to reduce noise emission from hydraulic machines

It is to be noted that in many industrialized nations, there are rules and regulations that restrict noise levels in the factories and workplace. The regular activities in the industrial areas using hydraulic machines and the resulting high noise emission of hydraulic components means that it is warning the machine operator to do something to reduce the noise of the machine in the working area. To do that you should know, “what exactly is the cause of the noise?”

Three Main Causes

Fluid Borne Noise

Structure Borne Noise

Air Borne Noise

The dominant cause of noise in hydraulic systems is the pump. The hydraulic pump produces fluid-borne noise and structure-borne noise into the system and radiates air-borne noise. All hydraulic pumps have a fixed number of pumping chambers, which operate in a continuous cycle like as opening closing of fluid inflow. The continuous process leads to a corresponding sequence of pressure pulsations, which cause the fluid-borne noise. This results in the downstream components to vibrate. The structure-borne noise is produced by exciting vibration in any component. The transfer of fluid and structure induced vibration to the nearby air mass results in air-borne noise.

How to reduce fluid-borne noise?

While the main cause of fluid-borne noise is pressure pulsation, it can be reduced through hydraulic pump design, though the problem cannot be fully eliminated. In large hydraulic systems or noise-sensitive applications, the fluid-borne noise emission can be reduced by the installing a silencer. The most simple form of silencer is the reflection silencer. This is widely used in hydraulic systems and it reduces sound waves by inducing a second sound wave of the same amplitude and frequency at a 180-degree phase angle to the first.

How To reduce structure-borne noise?

The structure-borne noise is caused by the vibrating mass of the power unit (this includes the hydraulic pump and its prime mover). This can be reduced through the elimination of sound bridges between the the power unit and valves and the power unit and tank. This is normally attained by using flexible connections like rubber mounting blocks and flexible hoses. In some cases it is necessary to introduce additional mass, the force of which reduces the transmission of vibration at bridging points.

How to reduce air-borne noise?

The force of noise radiation from an object is proportional to its area. This force is inversely proportional to its mass. Hence to reduce air borne noise, you can reducing an object’s surface area or increase its mass. For example, build the hydraulic reservoir from thicker plate. The magnitude of air-borne noise created directly from the hydraulic pump can be reduced by mounting the pump inside the tank. If the noise from hydraulic system remains outside the required level even after all the above noise reduction measures have been tried, encapsulation or screening must be considered.

Hydraulic Fluid Energy Storage

Another cause of noise in hydraulic systems is due to the storage and subsequent release of energy in the hydraulic fluid. Hydraulic fluid is not perfectly rigid. When the fluid is compressed, it results in energy storage. However if this compression is not properly controlled, the stored energy dissipates instantaneously. This sudden release of energy moves the fluid very fast, and this creates noise. So while handling hydraulic system, it is necessary to control the energy storage in hydraulic fluid.

Hydraulic Symbols Cheat Sheet Continued

Click on the links below to get cheat sheets 5 and 6 of hydraulic symbols. Print them off and use them for reference.

Cheat sheets 5 and 6 are lists of hydraulic symbols like valve hydraulic symbol, solenoid valve symbol, directional valve symbol, servo valve symbol, electric motor symbol, lubricator hydraulic symbol, gauge hydraulic symbol, indicator hydraulic symbol, thermometer hydraulic symbol, thermostat hydraulic symbol, silencer hydraulic symbol, cooler hydraulic symbol, filter hydraulic symbol, heater hydraulic symbol, level gauge hydraulic symbol, flow meter hydraulic symbol, etc.

Click on the links below to see the Working Line-Pressure/Return Hydraulic symbols, Hydraulic Cylinder Symbols, Hydraulic Motors Symbols etc.

Sheet 5
Sheet 6


Craig Cook

Hydraulic Symbol Cheat Sheets – Part 2

Click on the links below to get cheat sheets 3 and 4 of hydraulic symbols. Print these hydraulics cheat sheets off and use them for reference.

Cheats sheets part 3 and 4 are hydraulic symbols or schematic symbols of hydraulic valves, valves control hydraulic symbols, electric motor hydraulic symbols, reservoir hydraulic symbols, directional valve hydraulic symbols, filter, electro hydraulic servo symbols etc. 

Click on the links below to see the Working Line-Pressure/Return Hydraulic symbols, Hydraulic Cylinder Symbols, Hydraulic Motors Symbols etc. 

Sheet 3
Sheet 4


Craig Cook

Hydraulic Symbols

Click on the links below to get 2 cheat sheets of hydraulic symbols. Print them off and use them for reference.

These cheat sheets have a list of common hydraulic symbols and hydraulic schematic diagrams which are useful for reading, understanding and interpreting hydraulic schematics and circuit drawings. Click on the links below to see the Working Line-Pressure/Return Hydraulic symbols, Hydraulic Cylinder Symbols, Hydraulic Motors Symbols etc.

Next week I’ll put together another list of symbols you can print off and use as reference.

Sheet 1

Sheet 2


Craig Cook

Copyright © 2024. All Rights Reserved.